Using Substance Textures in Maya for Arnold Rendering.
This very basic tutorial will cover getting your exported textures from substance painter working in Maya using the Arnold rendering engine.
Also noticed after getting this done, I did not mention that you SHOULD name your surfaces and textures and not just leave them as file15 or aiStandardSurface4 like I did. It will make things way easier if you need to adjust things later, and it's a habit you need
In Substance Painter
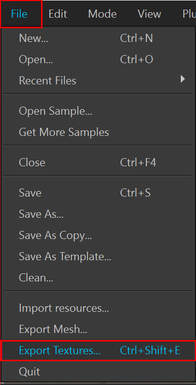
The first thing we need are the right textures to work with. So once you have completed your paint work we are going to the export option under the file menu. Or if you want to get fancy hit Ctrl+Shift+E
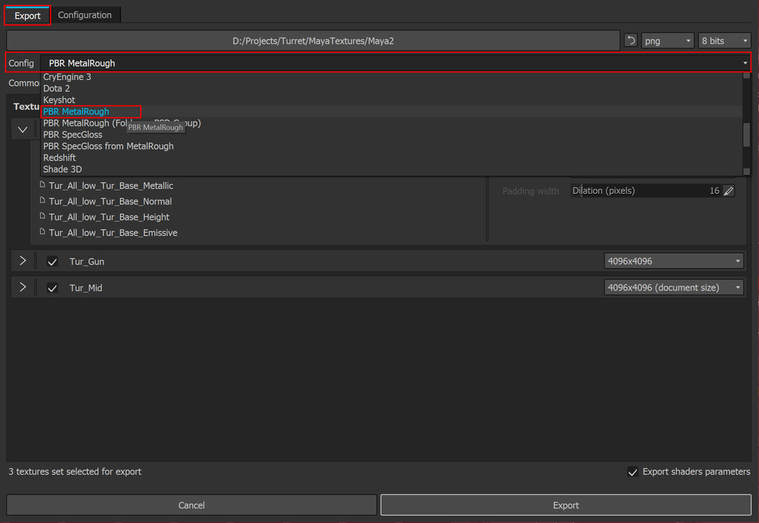
In the export textures pop up make sure you are in the Export tab. In here you want to are using the PBR MetalRough setting from the drop down.
INFO: PBR stands for Physically Based Rendering, it comes in two flavours depending on what you are outputting your images for. It is either a Metal/Roughness set up, or a Specular/Gloss set up.
Make sure to name your files and put them somewhere you can actually find them again.
In Maya
So in order to start plugging these textures in we need to create a new Arnold material. There are many ways to create materials and apply them to your objects, but I’m only going to show you one.
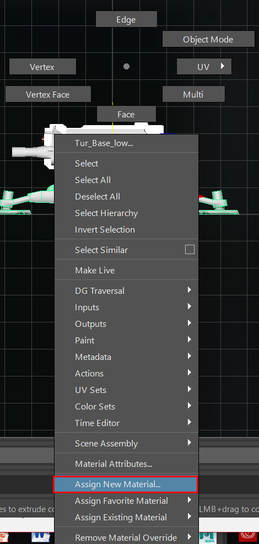
Right click and hold over your object and you will get list of available actions, down towards the bottom is Assign new material.
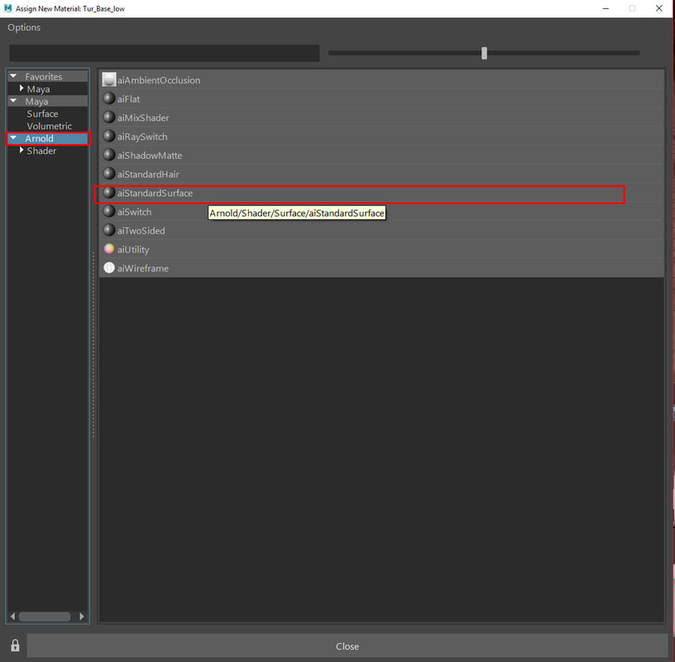
Click this and it will bring up the Create New Material pop up. In here you are choosing Arnold on the left hand side, which will show you the available Arnold materials. We are selecting aiStandardSurface.
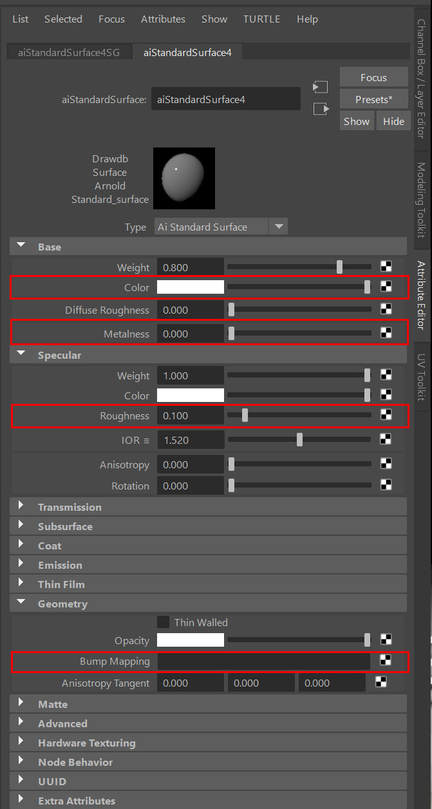
Once you choose the standard surface the information about the material will show up to the right on the attribute editor. In here we can see where we are going to put the 4 textures we rendered out earlier. Most are pretty straight forward, but here they are.
Base: Color = BaseColor
Base:Metalness = Metallic
Specular:Roughness = Roughness
Geometry:Bump Mapping = Normal
Base: Color = BaseColor
Base:Metalness = Metallic
Specular:Roughness = Roughness
Geometry:Bump Mapping = Normal
To the right of each of these is a checker box looking icon, this allows you to assign a texture to this attribute intstead of just using numbers. click that and it will open up the Attributes editor on the left again.
In here you need to select the texture file (folder icon). Also while this is open you need to make some adjustments to the Color Space and Balance (see image below). The break down of which textures need what settings is as follows:
Texture Color Space
Base Color sRGB
Roughness RAW + alpha is luminance
Metallic RAW + alpha is luminance
Normal RAW
Texture Color Space
Base Color sRGB
Roughness RAW + alpha is luminance
Metallic RAW + alpha is luminance
Normal RAW
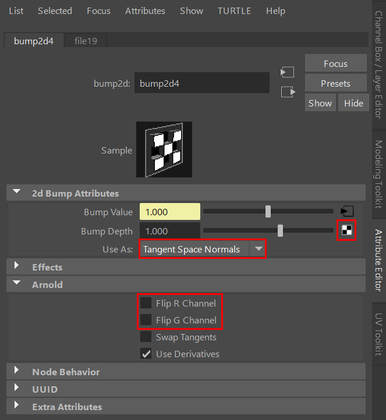
The Base Color, Roughness and Metallic are all going to be just the above steps. The Normal to Bump requires a few more settings, but Maya is nice enough to bring up the following dialogue box when you try and add a texture for bump mapping.
In here you need to select Tangent Space Normals in the "Use As", and make sure that Flip R and G are both unchecked in the Arnold section. Once you have those adjusted you are clicking on the checker board icon to set up your texture file like you did for the previous 3 textures.
And that's it, add some lights and you are good to go.
And that's it, add some lights and you are good to go.
